Home automation with Domoticz, ESP8266 and BME280
Posted: Mon Dec 26, 2016 11:01 am
I've been thinking about how to approach home automation for some time. I wanted something simple, open and easy to deploy with low maintenance cost. I was even considering developing my own custom solution but then came across the Domoticz home automation system, which turned out to satisfy pretty much all my needs and even brings some interesting unseen possibilities that might come in handy in the future. All this served in a nicely polished package, open source and free of charge, nice!

What's essential for me is that Domoticz can be easily installed on a Raspberry PI and that it supports the concept of virtual devices (sensors, switches, etc.) that can be queried and controlled via simple HTTP requests. This gives one great freedom and mainly enables me to use cheap and widely available ESP8266-based nodes as Domoticz clients, these can be deployed around my house in huge quantities serving all kinds of purposes.
I won't cover how to install Domoticz on a Raspberry PI in much detail, but it's very simple and straightforward (nicely covered here), basically all you need is to ssh into your PI and trigger the command bellow:
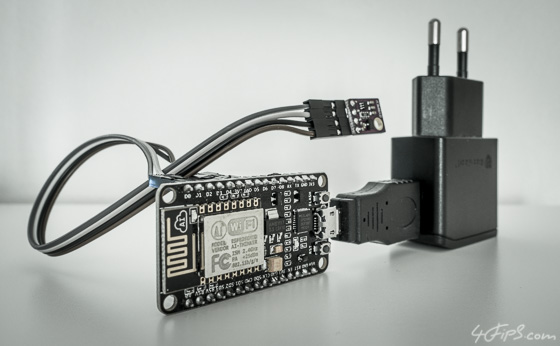
Then it's time to create a virtual device. In this case, we will populate the device with temperature, humidity and barometric pressure data coming from a BME280 sensor connected to an ESP8266 development board via I2C. The actual hardware looks like this:
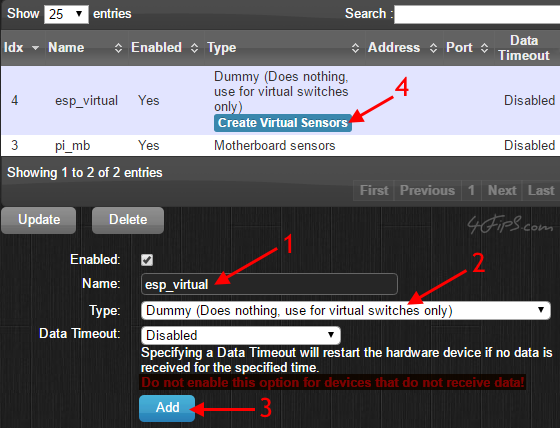
The image blow shows how to proceed, first we need to add a new virtual hardware. To do this, open Domoticz in your web browser, go to "Setup/Hardware" and name the new virtual hardware e.g. "esp_virtual" (1), then choose "Dummy" (2) as its type, and finally click "Add" (3).
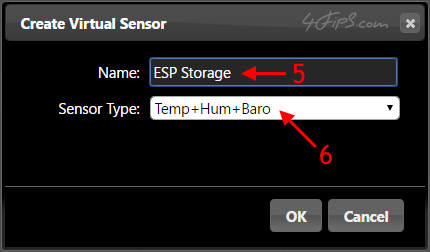
After the new hardware has appeared in the above list, click "Create Virtual Sensors" (4), then give your virtual device a name e.g. "ESP Storage" (5). For the BME280 sensor, choose the "Temp+Hum+Baro" (6) sensor type, this specifies the type and URL format of the data that will be pushed into the virtual device via HTTP requests.
After that, you can navigate to "Setup/Devices" to see the newly created virtual device as shows the image below. Please note that each of the devices has its own unique index "Idx", we will need this information later when issuing HTTP requests from the Lua script that drives the ESP8266.

At this point, it is very simple to verify that the virtual device has been set up properly. All you need is to slightly modify the URL below, namely change the IP address to match your Raspberry PI running Domoticz (10.0.1.20 in my case) and the index of the virtual device you've just added (7 in my case). Then you can open your web browser and enter the resulting URL, a modified version of this:
If your web browser prints out the below output in response, it's a good sign that everything works as expected.
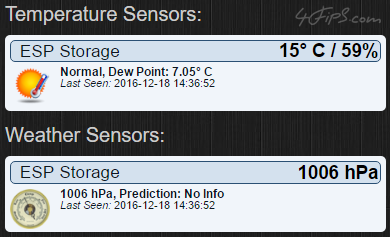
If you've already pinned up the virtual device in the dashboard, Domoticz should immediately reflect the values (temperature=15, humidity=59, barometric pressure=1006) that you've just sent encoded in the URL.
The final step is to program the ESP8266 so that it periodically fetches data from the BME280 connected via I2C and send it over to Domoticz. For this, I have prepared a Lua script (for NodeMCU) that you might want to reuse:
While connected to the ESP8266 and running the above script you can confirm it works correctly via observing the serial output, it is supposed to look something like this:
After running the script for several hours, Domoticz will reward you with a nice interactive graph:
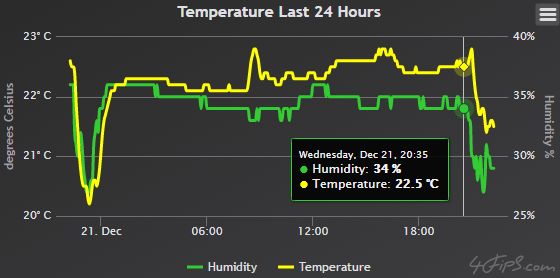
I've been running this setup for several days now with two ESP8266 nodes and everything seems to be rock solid, it even survived a power outage without any trouble (all nodes automatically booted up and resumed once power was restored). Overall, I'm pretty happy with this setup and will definitely invest more into this infrastructure in the near future, stay tuned!
Related articles:
Controlling the TP-Link HS110 smart plug with Domoticz

What's essential for me is that Domoticz can be easily installed on a Raspberry PI and that it supports the concept of virtual devices (sensors, switches, etc.) that can be queried and controlled via simple HTTP requests. This gives one great freedom and mainly enables me to use cheap and widely available ESP8266-based nodes as Domoticz clients, these can be deployed around my house in huge quantities serving all kinds of purposes.
I won't cover how to install Domoticz on a Raspberry PI in much detail, but it's very simple and straightforward (nicely covered here), basically all you need is to ssh into your PI and trigger the command bellow:
Code: Select all
sudo curl -L install.domoticz.com | bash
The image blow shows how to proceed, first we need to add a new virtual hardware. To do this, open Domoticz in your web browser, go to "Setup/Hardware" and name the new virtual hardware e.g. "esp_virtual" (1), then choose "Dummy" (2) as its type, and finally click "Add" (3).

After the new hardware has appeared in the above list, click "Create Virtual Sensors" (4), then give your virtual device a name e.g. "ESP Storage" (5). For the BME280 sensor, choose the "Temp+Hum+Baro" (6) sensor type, this specifies the type and URL format of the data that will be pushed into the virtual device via HTTP requests.

After that, you can navigate to "Setup/Devices" to see the newly created virtual device as shows the image below. Please note that each of the devices has its own unique index "Idx", we will need this information later when issuing HTTP requests from the Lua script that drives the ESP8266.

At this point, it is very simple to verify that the virtual device has been set up properly. All you need is to slightly modify the URL below, namely change the IP address to match your Raspberry PI running Domoticz (10.0.1.20 in my case) and the index of the virtual device you've just added (7 in my case). Then you can open your web browser and enter the resulting URL, a modified version of this:
Code: Select all
http://10.0.1.20:8080/json.htm?type=command¶m=udevice&idx=7&nvalue=0&svalue=15.0;59.0;0;1006.0;0Code: Select all
{
   "status" : "OK",
   "title" : "Update Device"
}

The final step is to program the ESP8266 so that it periodically fetches data from the BME280 connected via I2C and send it over to Domoticz. For this, I have prepared a Lua script (for NodeMCU) that you might want to reuse:
Code: Select all
--[ESPDOMOCL_1 BY FIPS @ 4FIPS.COM, (c) 2016 FILIP STOKLAS, MIT-LICENSED]
--[NODEMCU/ESP8266-BASED DOMOTICZ CLIENT, URL: http://forums.4fips.com/viewtopic.php?f=3&t=6898]
--[[
Hardware: ESP8266 development board, BME280 over I2C
Firmware via nodemcu-build.com: nodemcu-master-6-modules-2016-12-18-20-22-54-integer.bin
Required modules: bme280, (file), http, tmr, (uart), wifi
--]]
config = {
ver = "fips_espdomocl_1, Dec 2016, www.4FipS.com",
timer = { connect = 1, refresh = 2 },
-- The below ones need to be customized: 'ssid, 'pwd', 'host' and 'sensor_idx'
ap = { ssid = "MY_SSID", pwd = "MY_PASSWORD" },
domoticz = { host="10.0.1.20:8080", sensor_idx = 7, refresh_rate=60 },
pin = { sda = 1, scl = 2 },
}
function connect(on_ok)
print("CONNECT: "..config.ap.ssid)
wifi.setmode(wifi.STATION)
wifi.sta.config(config.ap.ssid, config.ap.pwd)
wifi.sta.connect()
tmr.alarm(config.timer.connect, 1000, 1, function()
ip = wifi.sta.getip()
if ip then
tmr.stop(config.timer.connect)
print("Connected: "..ip)
if on_ok then on_ok() end
else
print("Connecting...")
end
end)
end
function loop()
refresh()
tmr.alarm(config.timer.refresh, config.domoticz.refresh_rate * 1000, 1, function()
refresh()
end)
end
function refresh()
bme280.startreadout(0, function ()
temp10x, _ = bme280.temp() / 10
humi10x, _ = bme280.humi() / 100
baro10x, _ = bme280.baro() / 100
t, h, b = (temp10x/10).."."..(temp10x%10), (humi10x/10).."."..(humi10x%10), (baro10x/10).."."..(baro10x%10)
print(string.format("BME280: T=%s C, H=%s%%, P=%s hPa", t, h, b))
url = "http://%s/json.htm?type=command¶m=udevice&idx=%d&nvalue=0&svalue=%s;%s;0;%s;0"
req = string.format(url, config.domoticz.host, config.domoticz.sensor_idx, t, h, b)
print("REQ: "..req)
http.get(req, nil, function(code, data)
if code < 0 then
print("HTTP ERROR: "..code)
else
print("RES: "..code.." "..data)
end
end)
end)
end
print(config.ver)
bme280.init(config.pin.sda, config.pin.scl, nil, nil, nil, 0)
connect(loop)
Code: Select all
fips_espdomocl_1, Dec 2016, www.4FipS.com
CONNECT: MY_SSID
Connecting...
Connecting...
Connected: 10.0.1.13
BME280: T=24.1 C, H=34.5%, P=1006.8 hPa
REQ: http://10.0.1.20:8080/json.htm?type=command¶m=udevice&idx=7&nvalue=0&svalue=24.1;34.5;0;1006.8;0
RES: 200 {
"status" : "OK",
"title" : "Update Device"
}
BME280: T=24.2 C, H=41.0%, P=1006.8 hPa
REQ: http://10.0.1.20:8080/json.htm?type=command¶m=udevice&idx=7&nvalue=0&svalue=24.2;41.0;0;1006.8;0
RES: 200 {
"status" : "OK",
"title" : "Update Device"
}
...

I've been running this setup for several days now with two ESP8266 nodes and everything seems to be rock solid, it even survived a power outage without any trouble (all nodes automatically booted up and resumed once power was restored). Overall, I'm pretty happy with this setup and will definitely invest more into this infrastructure in the near future, stay tuned!
Related articles:
Controlling the TP-Link HS110 smart plug with Domoticz
