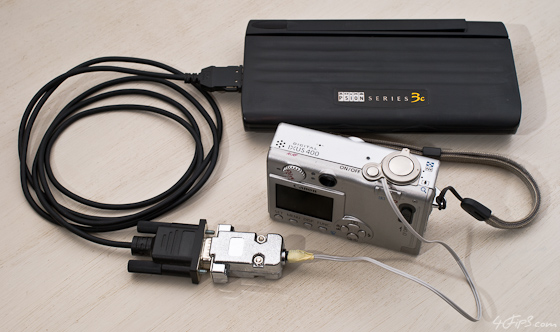
So I decided to make use of my old Psion 3c handheld (BTW, It's still a great piece of hardware, superior in many ways to the modern mobile phones and netbooks, but that's a completely different story) and brought to help the OPL programming language to automatically trigger the serial port of the Psion computer, which I then connected to the camera's shutter through an Opto-isolator. By far, the most difficult step was to disassemble the camera to hook up the wires. After that I had a fully functional time-lapse machine ready to use as you can see in the image below:

Although, I was quite happy with the setup above and had taken a great bunch of videos (2) with it, I started to think about something smaller and lighter, which could replace the whole Psion-thing. It was at the same time I learned about the Arduino project, which is a small easily programmable hardware platform for hobbyist that could be turned into a camera trigger with almost no effort. It all seemed quite promising, but I wanted to go even further, or smaller, if you like, and come across Atmel's ATtiny:
Using ATtiny, I could enjoy the comfort of the Arduino ecosystem, however, resulting in even more compact and less power hungry projects. That was exactly what I was looking for. So I started to wire things up. First, I made a working prototype involving Arduino itself, and then switched the Arduino into a programmer and loaded the original program into an ATtiny85 chip. It all worked perfectly on the breadboard:

Finally, I turned the prototype into a nice compact board powered by just a single CR2032 battery. I was more than satisfied with the result and moreover it all took me just a few days to finish without any previous experience with neither Arduino nor ATtiny. What a great platform!

Just for the sake of completeness, here are both the original Psion program and the one that drives Arduino/ATtiny:
Code: Select all
/*
(c) 2012 +++ Filip Stoklas, aka FipS, http://www.4FipS.com +++
THIS CODE IS FREE - LICENSED UNDER THE MIT LICENSE
ARTICLE URL: http://forums.4fips.com/viewtopic.php?f=3&t=717
*/

const int out_pin = 4;
const long interval = 2500; // 2.5 s
const long edge_duration = 250; // 250 ms
const long sleep_duration = interval - edge_duration - 250; // 250 ms to wake-up
long old_time = 0;

void setup()
{
  pinMode(out_pin, OUTPUT);
}

void loop()
{
  const long time  = millis();
  const long delta = time - old_time;
  if(delta >= interval)
  {
    digitalWrite(out_pin, HIGH);
    delay(edge_duration);
    digitalWrite(out_pin, LOW);
    delay(sleep_duration);
    old_time = time;
  }
}
Code: Select all
PROC Main:
    local n&, tm&, otm&, del&, per&

    per& = 3
    dInit "Time-lapse Shutter by FipS"
    dLong per&, "Enter sampling period (sec):", 1, 3600
    dText "", "ver 1.2 (2010), www.4FipS.com"
    Dialog

    n& = 1
    otm& = TimeSec&: - per& + 1
    do
        tm& = TimeSec&:
        print tm&
        del& = tm& - otm&
        if del& >= per& rem ### interval (sec) ###
            print "#"; n&, ":", tm&; "s +"; del&
            Activate:
            otm& = tm&
            n& = n& + 1
        endif
    until 0
ENDP

PROC TimeSec&:
    local h&
    h& = Hour rem cast to prevent overflow
    return Second + Minute * 60 + h& * 3600
ENDP

PROC Activate:
    lopen "tty:a"
        pause 5 rem ### 250 ms ###
    lclose
ENDP
